CLICK HERE FOR FREE BLOGGER TEMPLATES, LINK BUTTONS AND MORE! »

Thursday, January 17, 2013

Cards & Tags Thursday

Hi again!  Today over on the Memory Works Blog I am hosting my second installment of Cards & Tags Thursday.  Today I have created two tags showcasing the beauty of kraft cardstock.  I purchased this cardstock from Memory Works and you can see all the wonderful colors here.


I went a little "old school" for this first tag. My first step was to put the kraft shipping tag under running water and get it good and wet. Icrumpled it up and then smoothed it out. Next I sprayed it with walnut ink stain and then I used my blow dryer to dry it completly. I then ran the tag through my Big Shot using my clock face embossing folder. I have a pocket watch rubber stamp and using black ink I stamped images on the tag over the embossing. I stamped one image on cardstock and cut it out to adhere to the tag. I used two kraft clock faces from one of my Express Kits and added red bling to the centers of each. I used my typewriter to create the wording and cut like pennants and attached with my sewing machine. I topped this tag off with some red organza ribbon from my stash

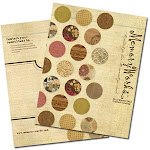
For this second tag I used my Big Shot and ran the tag through using another embossing folder and then cut the flowers from kraft cardstock and layered them and used simple pearl brads to hold them together. I added some glitter glue to the edges of the petals. I looped jute twine and glued to the tag wih my hot glue gun and attached the flowers on top. I added a few dots of glitter to the centers of the embossed flowers.
 
I think this tag is beautiful in its simplicity and monochromatic color scheme. I hope you liked these two tags and thanks again for joining me today for Cards and Tags Thursday.


Monday, January 14, 2013

Two Celebrations

Yesterday I had the priviledge of celebrating two lives.  The first celebration was to honor the mother of my best friend Maggie Cousins.  Her mother Melva passed away on December 9, 2012 and Maggie choose to hold the celebration memorial service this month a week after what would have been her parents wedding anniversary.  Melva's husband Dennis preceded her in death and now Melva has joined her loving husband for all eternity.  I wanted to create a card for Maggie that would honor her mothers memory but not one that looked like a typical sympathy card.  Melva was quite the seamstress and I remember all the lovely formals that she made for Maggie for Jobs daughters when we were in high school so I created a card to remind me and Maggie of this memory.


The second celebration yesterday was a family dinner celebrating my grandson Nicolas' 15th birthday.  We had a wonderful dinner at Fratellas Bistro in downtown Fowler followed by cake and ice cream at home.  I created a card for Nicolas that represented the vibrant young man that he is turning into.  I love to put the boys ages and names on their cards.  I used Simple Stories Awesome collection to create this card.
 
 
Thanks for stopping by today and please come again.


Thursday, January 10, 2013

Cards & Tags Thursday

Over on the Memory Works Blog I'm on duty today to bring you some cards that I designed.  So I'd like to share them with you here also.

The first two cards were created using cardstock and the Echo Park "This & That" 6 x 6 pad.
For this card I layered my cardstock and 6 x 6 papers and used my sewing machine to add a little texture. I stamped the XOXO on the ivory cardstock and created a pennant. I adhered the dotted paper on top of my other layers and punched two small holes to thread my jute cord through.
 
This card shows a great and simple way to use up small scraps. I just cut strips and adhered to my cardstock then I stitched down the center of each strip. I then punched tiny hearts out of matching paper and adhered at the base of my stitching.

These next two cards were created again using cardstock and Carta Bella "Beautiful Moments" 6 x 6 pad.
For this card I punched three squares and adhered to the top portion of the card front. I then cut a piece of coordinating cardstock and punched the decorative edge and adhered to the bottom portion. I wrapped ribbon around the center and tied a tiny bow in the middle. I then used the same tiny heart punch from the previous card and punched three hearts from the ivory cardstock and adhered to the center of each square. I inked black around each of the squares and my striped paper.

 I ran a piece of pink cardstock through my Big Shot using one of the embossing folders I got for Christmas. I cut a strip of the cute banner paper from the Carta Bella 6 x 6 and adhered to the bottom. I cut the three hearts using an old Sizzix heart die and attached over some of the embossed hearts. I stamped the sentiment on the reverse side of the banner paper and rounded the two bottom corners and adhered to the card.
Well, thank you for visiting today and I hope you enjoyed these cards and please come back next week because I'll be sharing some tags that I'm making to put on some Valentine's gifts.

Wednesday, January 2, 2013

Introduction Blog Hop


Hi!  Cathie Hollins here.  Welcome to the Memory Works introduction blog hop!  If you got here from Kelly Holbrook's blpg - http://kellyrholbrook.blogspot.com/ - you are in the right place! Didn't Kelly have some wonderful projects! 
I'm thrilled to be here for a second term and I'd like to share with you the projects that I submitted for my design team application.


The first two projects are the 12 x 12 layouts that I made.

This layout was made using the September Express Kit! 
This layout was made using the November Express Kit
This is the cover of my December Daily.  I used a mix of paper lines for this and the ribbon is from my stash

I also used the November Express Kit to create this Christmas Card. 

 Thanks for joining me today.  Your next stop is Gia Lau - www.thepaintedcrane.com -  You are going to LOVE what she has to share with you!